Node.js is one of the most popular server side technologies, and is can be used in a Azure App Service in a Web App or API App. We use Node.js extensively here at DVG, and we wanted to share some configuration tips that we’ve picked up along the way. First, I’ll discuss our general architecture and deployment pattern, and then discuss some of the configuration settings that we use to get Node humming along.
Architecture & Deployment
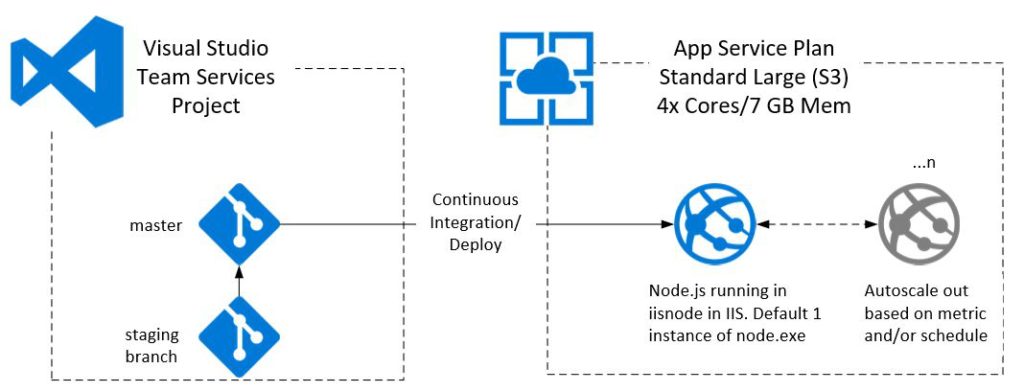
The image below shows a standard setup for managing and deploying our code to and Azure App Service. We use Visual Studio Team Services with Git, and build a CI/CD pipeline. We also usually use feature branching and use deployment slots within our app services (not included for simplicity). For this example we are using a App Service Plan that is sized at 4x cores and 7GB of memory using Azure A-series compute, which are VMs that are intended for general use production apps. The key detail here is that we have multiple cores that Node can run on (more on that later). Additionally, we have autoscale rules that scale our app service out. So, if we go from one app service instance to 2, we now have 8 cores available, and so on.

Fig 1. Example architecture for version control, deployment, and hosting in Azure.
Configuration 1 – web.config
For you .NET devs, the web.config file is old news. For the rest of us, the web.config file needs to be added to the node app at the root. Simply put, the web.config file is an XML file that IIS used for your site configuration. For example if your app has a server.js or app.js file in your Node.js project (usually at the project root), the web.config file should be in the same directory. Here’s what our typical vanilla web.config file looks like. Tomasz Janczuk’s Github repo has much more on IIS and Node, specifically this example web.config file. The two most basic things that you need to configure is the path/name of your server.js file (or app.js), as well as any static files you would like to serve. The file below shows this. I am using server.js for my node server and the /public directory to house the static content (see below).

Fig 2. Basic web.config file for iisnode app.
Configuration 2 – iisnode.yml
The second recommended configuration is to include an iisnode.yml file at your node project root (at the same level as the web.config) that enables you to control many of the iisnode settings. I’m not going to go into what all of the settings are, you can find an example of how to structure the YAML file as well as a full list of settings here and detailed explanation of Azure specific settings here. In this post I’m going to focus on one very important setting, and that is the nodeProcessCountPerApplication setting. This setting controls the number of node.exe processes that are utilited by IIS. The default value is one, meaning that only one node.exe process will be launched by IIS. The iisnode.yml file enables setting this value to 0, telling iisnode to launch as many node.exe processes as possible to match the number of vCPUs that you have on your VM. Alternatively, you could set this to a specific number of cores if you don’t want all vCPUs utilized. I mentioned above that our Azure App Service has 4 cores, so we set our node process count to 0 to utilize all 4 cores. As you can imagine, this provides a nice performance increase and fully utilizes the cores (that we are paying for!). Your iisnode.yml file can just simply have the below line of code
nodeProcessCountPerApplication:0
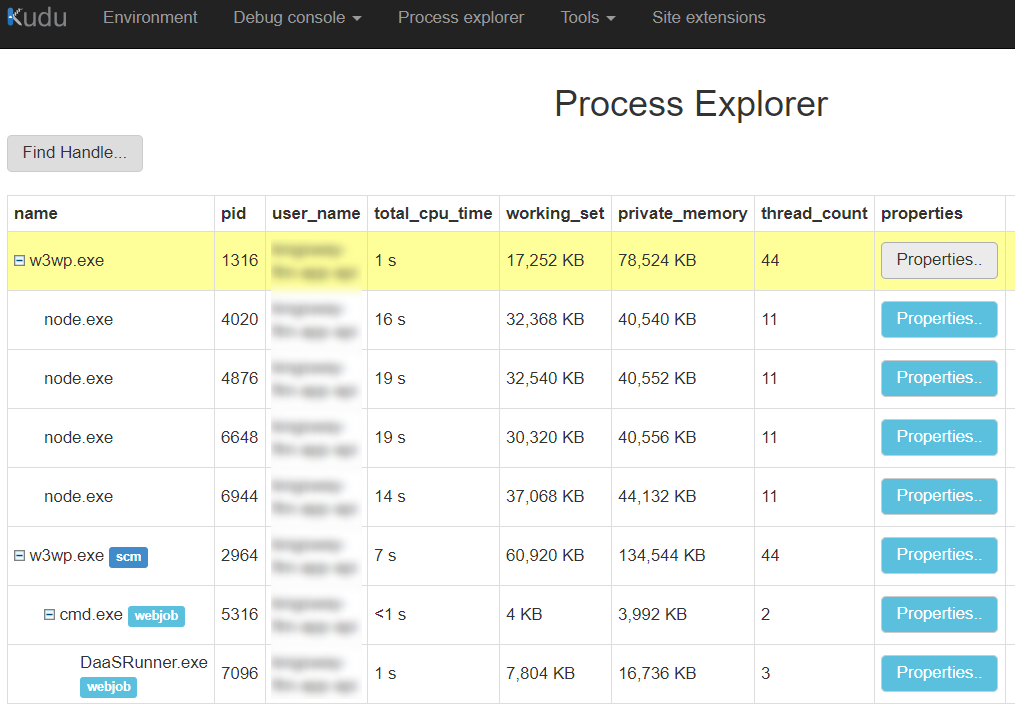
After you change this, go ahead an restart your app service. You can check to make sure the cores are being utilized in the Kudu dashboard. In the Azure portal for your app service, go down to Development Tools > Advanced Tools. This will launch the Kudu dashboard. On the top nav bar, click on Process Explorer. This will show all active processes on the VM. As you can see in the image below, there are 4 node.exe processes running on our app service.

Figure 3. Kudu process explorer for Azure App Service
Configuration 3 – Optimize you Azure App Service
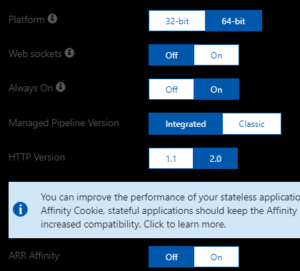
There’s a few more extra tweaks that can be made in the App Service Application Settings in the Azure Portal. Our configuration is below. We changed our application run on 64-bit, enabled “Always On”, changed the HTTP version to 2.0 and turned off ARR Affinity. Always on ensures that your app service does not go to “sleep” after requests have not been received for a while. This setting means that the app service will always be fresh and ready to receive requests, instead of going dormant. Below, you can see ARR Affinity is set to Off because we do not use session affinity in our API. Session affinity slows down the request response cycle since the load balance needs to read the headers and then route the request to the same server every time. This is avoided with ARR set off, and enables the load balancer to do “round robin” request routing (more here).

Figure 4. Azure App Service application settings.
Summary
This is only a sampling of things that can be done to configure and optimize your Azure App service, particularly for API services. In fact, there are more advanced configurations for API services like using Swagger docs to document your API, integrating API authentication with third party identity providers, and front-ending your API with Azure API Management. Hopefully this post jump starts your App Service development!


